Restoring an Android backup without a factory reset can seem like a daunting task, but with the right knowledge and steps, it’s entirely possible and straightforward. This guide will walk you through different methods to restore your Android phone from a Google backup, ensuring your data is back in your hands quickly, without the need to wipe your device. Let’s dive into the detailed steps, useful tips, and some common FAQs to get your Android device back up and running.
Understanding Android Backups
Before diving into restoring an Android backup, it’s crucial to grasp what these backups encompass and their storage specifics. Android backups primarily consist of app data, Wi-Fi passwords, and device settings. This comprehensive guide will walk you through the nuances of Android backups, emphasizing Google Drive and local backup options
Android backups typically encompass:
- App Data: This includes application settings, preferences, and sometimes even app-specific data like game progress or notes.
- Wi-Fi Passwords: Saved Wi-Fi networks and their passwords are backed up for seamless reconnection on new or restored devices.
- Device Settings: Personalized settings such as display preferences, wallpapers, and accessibility options are included.
Storage Options for Android Backups
Android offers two primary storage options for backups:
Google Drive
Most Android devices integrate with Google Drive for backup storage:
- Automatic Backup: Data from your device is regularly and automatically backed up to your associated Google account.
- Convenience: Google Drive backups enable effortless restoration of data when setting up a new device or after a factory reset.
- Security: Data stored on Google Drive is encrypted and securely managed, ensuring privacy and data integrity.
Local Backups
Some devices also support local storage options:
- Storage Locations: Data can be backed up locally on the device itself, an external USB drive, or an SD card.
- Control: Local backups provide users with more control over their data storage and can be a preferred option for those with limited or no internet access.
Preparing Your Android Device for Restoration
To ensure a smooth restoration process, a few preparatory steps are necessary:
Check Backup Settings
Before you proceed with restoring your Android device, it’s crucial to ensure that your backup settings are properly configured. Here’s a detailed guide to checking and managing your backup settings:
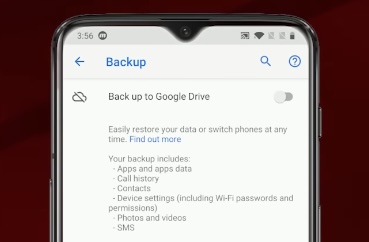
- Begin by opening the ‘Settings’ app on your Android device.
- Navigate to the ‘System’ section and tap on ‘Backup’.
- Here, you’ll find the option to enable Google backup. It’s important to ensure that this feature is turned on to securely store your device’s data, including apps, settings, and other essential content, on Google’s servers.
Verify Your Google Account
Verifying your Google account is an essential step to ensure that your backup is accessible and up-to-date when you initiate the restoration process:
- Access the ‘Accounts’ section in your device’s ‘Settings’.
- Locate your Google account and verify that it is active and properly synced. This ensures that the backup associated with your account is current and ready for restoration.
Connect to Wi-Fi
A stable Wi-Fi connection is indispensable for successfully restoring your Android device from a backup stored on Google Drive. Follow these steps to connect to Wi-Fi:
- Open the ‘Settings’ app on your Android device.
- Tap on ‘Wi-Fi’ and select a reliable network with a strong signal strength.
- Ensure that your device is connected to this network throughout the restoration process to avoid interruptions.
How to Restore Android Backup Directly from Google Drive
To restore your Android backup without a factory reset directly from Google Drive, follow these steps:
Open Settings App
To initiate the restoration of your Android backup from Google Drive, start by accessing the Settings application on your Android device. This is the control hub for all your device configurations.
- Navigate: Tap on the ‘Settings’ icon on your home screen or app drawer to open the application.
- Locate Backup Settings: Scroll down to the ‘System’ section and select ‘Backup’. This section houses all options related to device data backup and restoration.
Check Backup Info
It’s important to verify the backup details to ensure the data you intend to restore is accurate and up-to-date. This step prevents the restoration of outdated or incorrect data, which could affect device performance.
- Sync Status: Make sure that your device data is currently synchronized with your Google Drive account. This ensures that the latest data from your device is available for restoration.
- Backup Details: Review the specifics of the most recent backup. This includes checking the date and the types of data backed up (e.g., app data, device settings, call history). Confirm that it contains everything you need before proceeding.
Initiate Restoration
Once you have confirmed that the correct backup is ready for restoration, you can proceed with the actual data restoration process. This step will apply the backed-up data to your device.
- Select Restore Option: Within the Backup settings, find and tap on ‘Restore Data’. This option will lead you to a list of available backups.
- Choose Backup to Restore: From the list, select the backup that corresponds to the data you wish to restore. Ensure it’s the most recent or the most relevant backup.
Using Third-Party Apps to Restore Android Backup
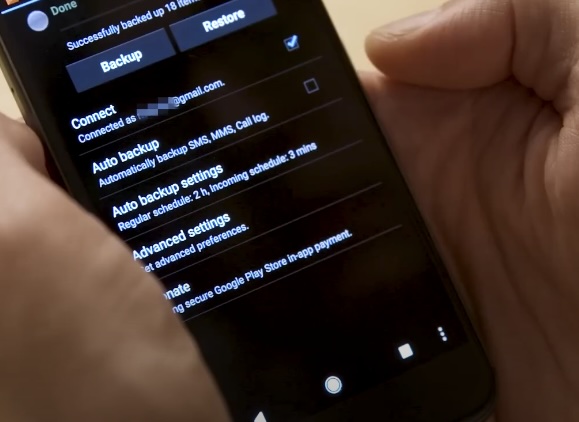
Several third-party apps offer more flexibility in what and how you can restore data to your Android device. Apps like ‘Titanium Backup’ and ‘Helium’ allow users to selectively restore files and apps without needing root access.
Download a Backup App
To initiate the process of restoring your Android backup, the first step is to download a robust backup application from the Google Play Store. Apps like Titanium Backup and Helium are highly recommended due to their reliability and extensive features that facilitate a more controlled and flexible restoration process.
- Visit the Google Play Store: Open the store on your Android device.
- Search for Backup Apps: Type ‘Titanium Backup’ or ‘Helium’ into the search bar.
- Check Reviews and Ratings: Ensure the app has a good reputation among users.
- Download and Install: Select the app and press “Install”.
Select Backup Source
Once you have installed the backup application, the next step is to select the source from which you want to restore the data. This involves locating the previously saved backup files either on your device’s internal storage or an external storage medium like an SD card or cloud storage.
- Launch the App: Open the backup app on your device.
- Grant Necessary Permissions: Allow the app to access your files, storage, and other necessary permissions.
- Navigate to Backup Location: Use the app’s interface to find and select the backup file you need.
- Verify the Backup File: Ensure the file is the correct one by checking its details like date and size.
Restore Selected Items
With the backup file identified, you can now proceed to restore specific items from it. This selective restoration helps maintain your device’s performance by not overcrowding it with unnecessary files.
- Select Items to Restore: Browse through the list of items in the backup and select only those you need.
- Preview Files: If supported by the app, preview files before restoring to ensure they are the correct versions.
- Initiate Restoration: Start the restoration process for the chosen files or apps.
- Monitor the Restoration Process: Keep an eye on the process, as some files may require individual permissions to restore.
Restoring Backup from a Local Source
If you have a local backup stored on an SD card or USB device, you can restore it without a factory reset by:
Connect the Storage Device
To begin, ensure your SD card or USB device containing the backup is ready:
- SD Card: Insert the SD card into the appropriate slot on your device. Ensure it is securely inserted and recognized.
- USB Device: Use an OTG (On-The-Go) cable to connect your USB device to your mobile device or computer. Ensure both ends are securely connected.
Navigate to Your File Manager
Once your storage device is connected, locate the backup file:
- Open your device’s File Manager application. Depending on your device, this might be labeled as ‘Files’, ‘My Files’, or another similar name.
- Navigate through the directories to find the folder where your backup is stored. Look for a directory typically labeled ‘Backup’, ‘Restore’, or named after the backup app you used.
Restore the Backup
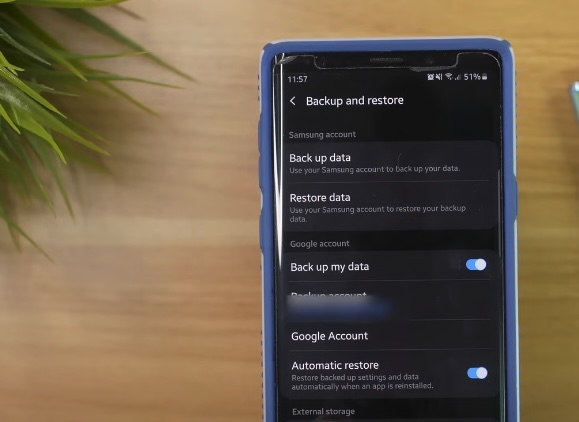
After locating the backup file, proceed with the restoration:
- Built-in Restore Function: Some devices offer a built-in restore option. Navigate to ‘Settings’, then ‘Backup and Restore’ or similar options. Select ‘Restore’ and choose the backup file you wish to restore.
- Third-Party App: If your device does not have a built-in restore function, consider using a reputable third-party app from the app store. Apps like ‘Titanium Backup’ or ‘Helium’ are popular choices for managing backups on Android devices.
Common Issues and Troubleshooting
Sometimes, issues may arise during the restoration process. Here are some common problems and solutions:
Incomplete Backups
One of the most frustrating issues users face is encountering incomplete backups when attempting to restore their data. This situation can arise due to various reasons, including insufficient storage space, interrupted backup processes, or selective backup settings. Here’s a comprehensive approach to address this problem:
- Verify Backup Completeness: Before initiating the restoration process, it’s essential to verify that your Google account has successfully completed a thorough backup of all critical data. Check the backup settings to ensure that all desired categories, such as apps, settings, and multimedia content, are included in the backup.
- Manage Storage Space: Inadequate storage space on your Google Drive or device can lead to incomplete backups. Monitor your storage allocation and consider freeing up space by deleting unnecessary files or upgrading your storage plan if needed.
- Restart Backup Process: If you suspect that the backup was interrupted or incomplete, restart the backup process from scratch. Ensure that your device remains connected to a stable internet connection throughout the backup procedure to prevent interruptions.
Failed Restorations
Failed restoration attempts can be frustrating, especially when valuable data remains inaccessible. These failures can stem from connectivity issues, improper account settings, or compatibility discrepancies between the backup and the target device. Here’s how to troubleshoot and resolve these challenges:
- Check Internet Connectivity: A stable and reliable internet connection is essential for successful data restoration. Before initiating the restoration process, verify that your device is connected to a strong Wi-Fi network or mobile data service. Avoid using public Wi-Fi networks or cellular connections with poor signal strength, as they may lead to data transfer interruptions.
- Review Google Account Settings: Incorrectly configured Google account settings can prevent successful data restoration. Double-check your account settings, including synchronization preferences, permissions for Google services, and restrictions that may impact data access. Ensure that your account has the necessary permissions to restore data from backups stored on Google Drive.
- Retry Restoration Process: If a restoration attempt fails, don’t panic. Retry the process after addressing any identified connectivity issues or account settings. Sometimes, a temporary network glitch or synchronization error may cause the initial failure, which can be resolved by attempting the restoration again.
Data Compatibility Issues
Data compatibility issues often arise when there are significant differences between the version of applications or operating systems used during the backup and the current configuration of your device. These discrepancies can lead to errors during the restoration process, resulting in incomplete or corrupted data. Here’s how to mitigate compatibility challenges:
- Verify Application Versions: Before initiating the restoration, compare the version of applications and the operating system used during the backup with those currently installed on your device. Significant disparities in version numbers or software updates can cause compatibility issues. Update outdated applications to their latest versions to ensure compatibility with the restored data.
- Update Operating System: Ensure that your device’s operating system is up-to-date with the latest software updates and security patches. Operating system updates often include improvements in data handling and compatibility, which can enhance the success rate of data restoration processes.
- Use Compatibility Modes (if available): Some devices and applications offer compatibility modes or settings that facilitate the restoration of data from older backups. Enable compatibility modes or adjust settings as recommended by the application developer or device manufacturer to ensure seamless data transfer.
Tips for Maintaining Regular Backups
Maintaining regular backups is crucial for data security. Here are some tips:
Automate Backups
Automating your backup process simplifies the task of preserving critical data regularly. By setting up automatic backups on your devices, you ensure that important information is consistently saved without manual intervention. Here’s how to automate backups effectively:
- Use Google Drive: Utilize Google Drive’s built-in backup feature to automatically store your data in the cloud. Configure your device settings to perform daily backups to Google Drive, ensuring that all updated information is securely stored online.
- Schedule Backup Times: Set specific times during off-peak hours when backups are less likely to interfere with your device’s performance or network bandwidth. Customize backup schedules based on your usage patterns to optimize efficiency.
Use Multiple Backup Methods
Relying on multiple backup methods enhances data redundancy and strengthens your overall data protection strategy. In addition to Google Drive, consider diversifying your backup methods to include third-party applications or local storage options. Here’s how to implement multiple backup methods effectively:
- Third-Party Backup Apps: Explore reputable third-party backup applications that offer additional features, such as advanced encryption or automatic synchronization across multiple devices. Choose applications compatible with your operating system and storage preferences for comprehensive data protection.
- Local Backup Solutions: Implement local backup solutions, such as external hard drives or network-attached storage (NAS) devices, to create physical copies of your data. Regularly update local backups to reflect changes in your digital environment and ensure accessibility during network disruptions.
Regularly Update Backup Settings
Maintaining up-to-date backup settings is crucial for adapting to evolving data storage needs and expanding digital ecosystems. Regularly review and adjust your backup configurations to accommodate new applications, important files, or changes in data management practices. Follow these steps to optimize your backup settings:
- Review Backup Frequency: Assess the frequency of automatic backups to align with your data usage patterns and update intervals. Increase backup frequency for critical files or projects requiring real-time synchronization across devices.
- Include New Apps and Files: Periodically add new applications or recently created files to your backup schedules to prevent data loss due to oversight or system updates. Verify compatibility between backup settings and emerging technologies to maintain seamless data continuity.
Conclusion
Restoring your Android backup without a factory reset is an effective way to get your device back to its preferred state without losing data. By following the outlined methods and tips, you can ensure a safe and efficient restoration of your Android device. Whether you choose to restore from Google Drive, use a third-party app, or opt for a local backup, the process can be straightforward and hassle-free. Remember to maintain regular backups to safeguard your data against future issues.
This guide provides you with all the information needed to restore your Android backup without the hassle of a factory reset. Now, with your data restored, you can continue using your Android device with all its settings and preferences intact.
FAQ
Yes, you can log into your Google account on the new device and follow the steps to restore from Google Drive.
Ensure your device is connected to a stable internet connection, check your Google account for issues, and try restoring from another backup if available.
Use secure Wi-Fi networks for data transfer and consider encrypting your backup data for additional security.